Updated July 10, 2023
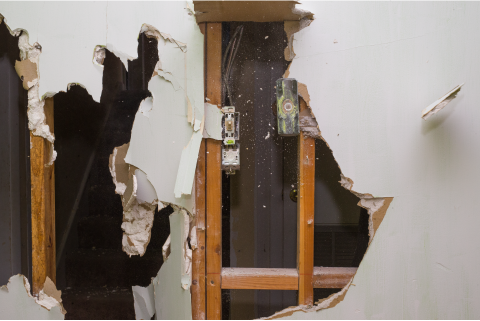
Interior demolition work, especially more aesthetic work, can often be done by the homeowner if they have adequate experience, equipment, and confidence to do so.
In most cases, we strongly recommend hiring a professional to handle the work, as failing to utilize the proper tools and techniques during an interior demolition is a sure-fire way to end up with a dirt and dust-ridden home at best and a dangerous situation at worst.
Whether you DIY or hire a professional to do the job, it is imperative that your property is protected during interior demolition.
Here's what to know...
Find interior demolition contractors near you
DIY Interior Demolition Tips
If you are handling the interior demolition yourself, these safeguards should not be overlooked:
Build Dust Barriers
Whether you’re remodeling your kitchen, bathroom, bedroom, or your entire home, dust barriers are one of the most versatile, convenient, and efficient means of keeping dust secluded to a workspace.
Dust barriers are essentially temporary walls made of plastic stretched between the ceiling, floor, framing, and walls.
It allows you to cover a door, seal off a hallway, or create a room within a room, oftentimes with non-damaging adhesive pads rather than tape.
Cover Up Air Ducts
If dust finds its way into your return air ducts, you could end up with a coating of dust in every room in the house or a clogged furnace filter.
In addition to closing the dampers on supply registers, you’ll also want to use plastic and tape to sufficiently seal them. (Keep the heating and cooling systems off when ducts are covered to avoid damaging the system.)
Protect Furniture and Appliances
It probably goes without saying, but you’ll want to cover all the furniture and appliances in the work area. (That is, if you can’t remove them from the room entirely.)
Plastic sheeting and drop cloths are favorites of the pros and are great for protecting your valuables from dust and getting marked up.
Use a Fan to Drive Out Dust
A simple fan pointing out the window can help keep the dust levels down a great deal and also helps to create a slight vacuum within the dust barrier work area.
This will limit the likelihood of dust sneaking out of those little cracks in the plastic, and instead, drive it out the window.
For the best airflow, you may want to crack a window or door on the opposite side of the room.
Vacuum Without Adding to the Dust
A shop vac is a common tool used to vacuum up debris from a project, but it can sometimes kick up more dust than it sucks up; so we recommend running a hose from the exhaust port to outside the house.
Or you could get a high-efficiency vacuum filter that traps all dust particles, even the teeny tiniest bits.
Utilize Cardboard
Cardboard is a remodeler’s best friend. Whether you save all the thick cardboard boxes you get leading up to the project or you buy it, we advise you stock up before the project begins.
Cover Flat Surfaces
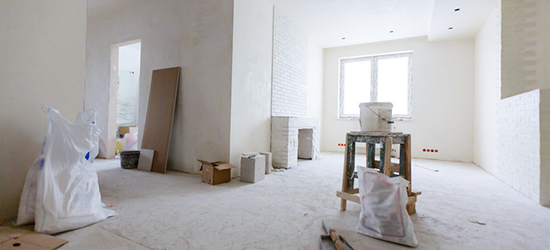
We all know dust settles on flat surfaces—it’s a part of life. But when your house becomes a work zone, the dust can seem otherworldly.
On top of that, most flat surfaces inevitably become temporary storage for the various tools and materials the project requires.
Protect kitchen countertops and other flat surfaces by covering them with cardboard and taping it down so it stays put.
This goes for floors, too.
Keep the floor leading to and from the work area thoroughly protected.
Roll out plastic floor protector to quickly and easily protect your floors without spending much money.
Using booties on your shoes is another way to protect floors. They’re cheap and are available at nearly any home improvement store.
Runners, which are long, narrow drop cloths, secured with small nails driven right into the carpet are great for protecting your stairs.
Protect Corners and Baseboards
Outside corners are prone to bumps and scrapes, so cardboard can come in handy there, too.
Cut strips out of thick cardboard boxes and run them along corners and doorways that lie in harm’s way. Hold them in place using painter’s tape for easy removal when you’re done.
The same goes for baseboards: Cover them with strips of cardboard that are slightly larger than your baseboards to keep them safe.
Cover Walls
If any walls are at risk, don’t hesitate to cover them with cardboard, too. It may seem like an unnecessary pain, but it’s better than accidentally damaging the walls and having to fix them.
Interior demolition oftentimes involves hauling loads of materials and debris around corners and through tight spaces.
Protect Windows
The last thing you want is for your window treatments to get damaged. Replacing them can be expensive, and cleaning them can be a pain.
The best way to protect your windows is by covering them with plastic sheeting.
Tape the plastic to the top of the window casing—the border that surrounds your window—so that it overlaps it slightly.
Tuck the plastic around the casing, taping as you go so there is a tight seal.
You may also want to remove the screens in your windows and doors if there’s a chance of them being damaged. This is especially true for screen doors that are in main traffic areas.
Protect Your Tub
If your interior demolition involves your bathroom, and that bathroom contains a bathtub, do not neglect to protect it.
Dropping a hammer or other heavy tool on that big, beautiful tub of yours is the last thing that bathroom remodel needs, so keep it safe by brushing or rolling on a thick protective rubber coating. (We recommend two coats to be safe.)
When your project is done and the tub is no longer at risk, simply peel off the coating.
Learn more:
- Projects to Tackle While Social Distancing at Home
- Wall Demolition Tips for the DIY Homeowner
- The Homeowner’s Guide to Interior Demolition
- Small Demolition Projects: DIY or Hire a PRO?
Find interior demolition near me
Tips for Hiring a Professional

If, instead, you decide to hire a professional interior demolition contractor to handle the project, they should handle this entire process for you.
But not all interior demolition contractors are created equal.
While some companies specialize in interior demolition and are seasoned professionals, other companies hire just anybody who will “rip and tear” for $10 an hour.
To help you determine which contractor is experienced and will do what it takes to protect your home, you’ll want to ask every contractor you speak with about all the important stuff:
- How will you protect my floors from becoming dirty or damaged?
- How will you protect my baseboards and walls from being dented or scraped?
- How will you keep dust from making its way into the rest of my home?
- How will you keep my windows protected?
- How do you plan to protect my furniture and appliances?
No matter how you slice it, interior demolition is a messy business. Hiring a professional interior demolition contractor with experience can eliminate safety risks, help minimize the mess, and reduce the amount of time your home is a construction zone.
Keep reading:
- 7 Keys to Successfully Hiring a Demolition Contractor
- 2 Jobs, 1 Contractor: How to Save Money on Demolition Projects
- 13 Must-Ask Questions to Side-Step Contractor Scams
- A State-by-State Guide to Contractor License Requirements